Tuesday, September 17, 2013

Lake Tahoe Trip

 
Update: a few weeks ago, Chris and I took a trip to Lake Tahoe with my sister Ruth and her husband Jordan. It was absolutely beautiful, and so much fun.
We spent a lot of time scrambling around the rocks, shrieking in delight over all of the crawdads, luring them out with bacon and scooping them into our buckets with nets. We must have caught 50 or 60.

Unfortunately, we didn't realize that if you keep them in a Styrofoam box for a few hours, they die. We went out for dinner that night.

It was a perfect combination of pine-forested mountains, rocky pools, and clear lake water. Someday, I think Chris and I will go back to camp and kayak and explore the area a little more. (We will be cooking for ourselves, though--the restaurants in the area are not a great alternative to dead crayfish.)...Doesn't Chris look cute with his little scruffy beard and boyish smirk? I think he looks darling (ahem, manly!) In these pictures.
 Here is my lovely sister Ruth, with her precious little girl Evelyn...
 Evelyn was a little dubious about the water and sand, but after a while she got used to it and started having a lot of fun. She was sweet and giggly, and fascinated by the crawdads. But more so with the potato chips and Oreos.
Aren't they precious? It makes me so happy when I see how much my sisters love their children and their husbands and my parents and each other. Love is just one of those things--you can feel it even when it isn't directed at you.

 It really is such a beautiful place...the mountains are just bending down to kiss the lake.
 Selfie! (Just for Elise!!)

It was so fun, and a much-needed break before school. Someday we'll go back and see this again:

Christmas Body Scrub

I love Christmas, and about this time of year I remember it is coming and I get really excited. I want to wear boots and scarves and gloves and fall colors, and I want to bake cookies and pie and have warm bread and soup for dinner. I start thinking about Christmas gifts, and that gets me even more excited...I absolutely LOVE giving gifts. It is the most exciting warm fuzzy thing ever. This year I am considering doing handmade gifts for everyone...just to make the gift giving experience even more exciting  and personal and last much, much longer.

So, I've been experimenting, and I've finally come up with the perfect recipe for a Christmas Body Scrub. Not only does it leave your skin feeling amazing, it SMELLS like Christmas!!

Here's my recipe:
1 cup sugar
1 cup brown sugar
1 1/2 Tbsp cloves
zest of 1 orange
juice of 1/2 orange
1/8 c olive oil

In a bowl, combine white and brown sugar.Both sugars are exfoliating, though the white sugar is harsher (use more or less of each depending on how gritty you want this to be).

Using a mortar and pestle, grind the cloves until they are in small pieces. it's okay to still have some chunks. (Yesterday I was making this and I didn't have a mortar and pestle. Chris improvised by putting the cloves in a plastic baggie and smashing them with a weight. It actually worked really well :))

Add the cloves and orange zest to the sugar mixture. Mix thoroughly, then add the juice of 1/2 an orange and 1/8 cup of olive oil (I used canola oil, which also works, but olive oil is nicer.)

Mix and spoon into air-tight containers. I used little mason jars, but plastic would be better if you are planning on  using this in the shower, plus it prevents bacteria if you are going to have a bigger jar and be using this for a long time. My jars are tiny, and I want to use them for my hands and feet, so I used glass.

I found a cute printable for the lids online--there are tons of free ones. If you are giving these as a gift, It would be cute to add a little spoon and ribbon with instructions for use.
To use, stir the contents of the jar and spoon 1/8 tsp into your hand. Gently rub into wet skin. This is not a very gentle scrub, so don't rub too hard, and don't use it on your face. Rinse with water and feel how soft your hands are!! (And run around telling everyone to smell your hands!)

What do you think about homemade gifts? Give this recipe a try and tell me how it works for you!!


Monday, September 9, 2013

Stenciled Dishtowels

Hello All! I'm sorry I haven't posted in a while, but our trip to Tahoe and the sudden start of school means I'm a little behind on blog updates. Plus, We've been doing so many projects we haven't had time to update on them all.

 The chair is progressing, but is currently stalled (Chris left all of his tools at Ruth's house, so we can't work on it until he gets them back). I am hoping to finish it this week, I'll keep you updated.

 In the meantime, I have a new favorite speedy craft! Stenciled and stamped Dishtowels. They are easy, cheap, and fun. Best of all, they allow for a lot of creativity and personalization! Here's what you need:
Floursack towels ($5 for 5 at Walmart)
Stencils ($1 at JoAnn's, or $5 for bigger ones at Hobby Lobby)
Fabric Medium ($2 at JoAnn's)
Acrylic Paint ($65 at JoAnn's)
Foam sponges ($3 at JoAnn's)
Rubber ABC stamps ($20 at JoAnn's, but I got mine on sale for $10)
Paper bags from your grocery store
You can cut the cost by just doing stencils, or even making your own! Here's how you do it:

1. Figure out how you want to fold your towels. I find that the neat little package the stores sell them in is almost NEVER how I fold mine. Fold them how YOU will fold them from now on, and iron them flat for a good work surface (I hate ironing, so I smoothed mine out and skipped this step ;))

2. Cut a paper bag to fit inside your towel. The paper bag will prevent the paint from bleeding through the first layer of towel. (I ran out of paper bags and started using the stencil backing--it was plastic, so it still didn't stick. Just don't use newspaper or paper towels, or anything that will stick to the paint when it dries.


3. Mix your paint. I chose to mix fabric medium with acrylic paint because there are more color options, but you can use fabric paint, too. Just make sure whatever paint you use is for fabric, so that you can wash and reuse these towels. For fabric medium and normal paint, you mix 1 part fabric medium for 2 parts normal paint.


4. For stenciling, position your stencil and use a foam sponge to apply paint. If you want to stamp words on the towel, apply paint with a sponge to the stamp and press the stamp carefully to the towel--not too hard, or you will have a border, not too light, or it won't show up.


 5.  Lay out the dishtowel to dry. DO NOT REMOVE THE PAPER BAG INSERT UNTIL FULLY DRY...It will make a big mess if you do.


 6. Wait 24 hours, then iron the towels. The heat from the iron works with the fabric medium to make your design permanent. Do not use the towels until after they have been ironed. That's it! Super easy!


 I made these for a friend's bridal shower, for a sick friend, and last night I did a few for my mom and mother-in-law. Here's some ideas for stencils:
-farm animals
-forks, knives, and spoons
-fruit or vegetables
-borders
-keys
-sail boats and anchors
-polka dots
And here's some ideas for sayings or words to stamp on (Some of these I used, others I just think would be cool)
-bring home the bacon
-let them eat cake
-home cooking is best
-hey honey
-let's eat
-kiss the cook
-eat at mom's
-eat your veggies
-I like my food dead. Not sick, not dying, dead.
-All your kind words and all your well wishes never replace your help with the dishes
-eat, drink, and be merry
-bon appetit
 -all good wives let their husbands eat dessert first
-I kiss better than I cook
-A balanced diet is a cookie in each hand
-Cooking should be entered into with abandon or not at all
-People who love to eat are always the best people
-I ate my willpower
-We love our bread, we love our butter, but most of all, we love each other
-Do you know the muffin man
-you don't have to like it, you just have to eat it

I think it would be fun to do holiday ones, too--handmade Christmas gifts!? ...Trees, gingerbread men, angels, bells, holly, reindeer...I think it would be really cool to have holiday dishtowels. :)

Monday, August 19, 2013

Part 2: Tufting the Back and Seat

Saturday was a crazy work day for this chair. We went shopping in the morning, and got a killer deal at Joann's for the fabric (80% off!! Only paid 60 bucks for 7 yards!!), bought tons of foam at Home Depot for $50 (soo much less than at craft stores. And I think I'll have plenty to do another project after this one.), and got some batting to protect the fabric from exposed wood and springs.
We also spent a fair amount of time driving around desperately trying to find button forms for the tufting...we went to an upholstery store, Joann's, Michael's, you name it. No one seemed to have them, though everyone said everyone else would. We gave up and decided to reuse the old ones. More on that later.
I went to the fabric store thinking I wanted a solid dusky rose color...something to add some very subtle color. I did not get it--I fell head over heels for this instead:

I love, love, love this print. It was 20 bucks a yard, but with the 60% off sale and our 20% off coupon, we could just swing it.
We came home and got to work...cutting the foam, shaping it, drilling holes in it for the tufts. Our method was pretty much look how the original was done and mimic it any way you can.
The buttons were a challenge. I assigned Chris the job of separating the original forms (tough one, because they are only meant to be used once, and aren't made to come apart.) We tried for a while to cover them the way you normally would, but quickly realized that it wouldn't work with used forms. So, I cut big circles of fabric, wrapped them around the forms, and tied them with a piece of thread. (Normally, you would push the fabric into the inner circle of the form, which would clamp it in place. Doesn't work when you've taken apart the original form and it's lost its shape.)

It was pretty tedious work, but once it was done, the tufting was actually really fun. The challenge with tufting is to get the fabric positioned the way you want it. I made it simple by pulling it as tight as I could, adjusting the wrinkles, and pushing the button as far into the foam as it would go...it kept it pretty consistent.
  

I had cut the foam to size by laying the old foam over the new and tracing it out. We did something similar with the holes--just drilled through the existing holes in the foam into the new foam. It kept it simple by eliminating all the measuring we would normally do. Then we just laid the fabric over the new foam and pulled the excess fabric towards the bottom, since we started tufting at the top. (You need more fabric than you think you do, the tufting takes up quite a bit.)
When we were done, we stapled the foam to the chair frame. Here is where all those photos we took while taking it apart came in handy--we knew to wrap the foam over the back of the chair and staple it down, and pull it down and between the back and seat. We only stapled the top, because the fabric, once pulled tight and stapled in place, holds the foam where it needs to be. We didn't staple any foam for the seat, since the fabric pulled through on all sides and we could staple it down. 
OH! And I forgot to mention that we restructured the seat and the springs. Chris got some rope and bound the springs in place, and we screwed some boards in about 5 inches beneath the springs to make the chair more stable, and make sure the springs didn't sag down too far. We also added a layer of foam and batting underneath the springs, but on top of the boards. The original chair didn't have this, and I think it makes the chair more stable and more comfortable. Our saggy seat is gone forever, now we have a firm, but comfortable, chair to sit in.
After a full day's work, and making a MESS of our living room (No joke, Chris didn't even bother to go outside to saw through those boards--it was such a mess a little sawdust made no difference), we were exhausted, but we had finished the biggest part of the chair. Here's how it looks now:
It looks absolutely fantastic. I can't wait to do the arms and wings, and put the final pieces on the back and sides...but I need to find someone to borrow a sewing machine from first, so I can do the piping. And I need to make a decision about the chair legs...I planned initially on painting them white, but now I'm not doing the rose chair anymore, and this fabric has a lot of white in it, so the original brown legs don't look too bad. I think I may just sand them down and put a fresh coat of dark stain on them. 
We are planning on finishing this in the next few days...Chris is building a custom window seat for my sister Ruth, and we want to have this out of the way by then. Plus, Ruth was with me when I got this chair, and she got one herself:
It feels a little Dolores Umbridge-esque to me, but I think she is planning on replacing the hot pink with a subtle floral. Anyway, I promised to reupholster it with her, so I think that will occupy me while Chris is framing the window seat.
I promise to blog again by Wednesday. Have a great week everyone! 
..and some advice from Chris: get your sleep while you can!
...he falls asleep so fast lately...probably because I have him up till 1 pulling out staples. That's true love right there.

Saturday, August 17, 2013

Part 1: Stripping the Chair

I few days ago, I was wandering around DI (My town's big thrift store) and I stumbled upon this little beauty:

Now, I am a HUGE fan of blue. and Wing-back armchairs. and tufts. and rolled arms. But I am NOT a fan of smelly furniture with cat hair all over it, stains, worn-out fabric, and popcorn in the seat. Also not a big plus when the springs are broken and you sag to a few inches above the floor when you sit. I got all of this and more in this $20 purchase.
I've been wanting to learn how to reupholster for a while now. I read some really detailed blogs that helped so much. This one was by far the best.
But even so, all of the blogs focused on simple reupholstery...Adding a fabric seat to a wooden chair, making a simple fabric bench, things like that. Everything was pretty simple--nothing has as much work to do as this chair, which is maybe why I picked it...I like a challenge, and I wanted something that I would learn as I went along.
So, here's what I've learned so far!
1. Upholstery is about layering. It's about pulling fabric tight, stapling the heck out of it, and hiding your piles of staples with another layer of fabric, brass tacks, or welting.
(that picture looks weird because the chair is laying on its back, and Chris is kneeling on the back ripping out the front. That's why my leg is hanging out in space halfway up the chair.
2. You need to know how a piece is put together to know how to take it apart and reassemble it. I recommend taking a ton of pictures and studying your piece before you rip into it.
3. When you take something apart, you need to start with the final layers--the final things that were placed on to hide the edges. This probably means ripping off some welting or brass tacks first--these things cover exposed staples.
4. As you pull staples out and remove sections of fabric, write what it is, where it goes, how it folds, and what order you removed it in. When you reupholster, you will want to know the order you took it apart in. For example, I took off the brass tacks, the face of the rolled arms, then the front seat panel, then ripped off the four seams that were hidden underneath the chair, which led me to take off the panels on the sides under the arms, then the outside of the wingbacks, then the back of the chair, then the inside of the wingbacks and arms (one piece), then the seat, then the seat back. So, when I put it back together, I will do the seat back, then seat, then insidewingbacks and arms, back of the chair, outside wingbacks, side panels under the arms, front seat panel, face of rolled arms, and finally the brass tacks to cover those last seams. The order matters, because everything is placed to cover up something else, and if you mess it up you will be back to ripping out stapels.
6. Remember or take pictures so you know how something is constructed. If it is a piece of fabric stapled to a cardboard strip to the chair, and then wrapped over, and that's how they hide the seam, take a picture or write it down so you remember how to hide that particular seam next time.
5. Get someone to help. It took me and Chris about 5 hours to strip the chair down to its bones...it would have taken me triple that by myself (Chris is a fast worker, and after building fences all day, sitting on the floor pulling out staples was relaxing for him. And his hands are calloused all over, so he didn't whimper every time he got stabbed by a staple.)
6. Save what you can. Our chair was in pretty bad shape, and smelled, so we threw away all of our batting, cardboard strips, and foam, but we were able to save some nail strips, some interior cording, and brass tacks.
7. Figure out if anything is wrong with the chair, and how you want to fix it. If it smells, throw away the interior. If it is dirty, get some heavy-duty cleaner and scrub the remaining exposed wood. If you hate the dated wooden legs, sand, prime, and paint. If the springs are broken and the seat sags, get new springs, fix the connector for the surviving old ones, and come up with a new method of construction that suits your desire for a soft but firm seat. Our chair had springs, then batting, then foam, then fabric. We are planning on adding some wooden crosspieces for stability, extra foam, extra batting, THEN springs, batting, foam, and fabric.

So, if you are working on ripping apart a chair, I guess I have this to say: every chair is different. Yours might have welting that was glued over some staples, and you can just pull it off to get at them. Or it might have a metal strip of nails hidden under the fabric that doubles as staples and camouflage, and you need to pry it off with a hammer. Figure out how to take it apart piece by piece, take pictures, and remember how to do it for later.

If all goes well, and you stick to it, you should have this in less than a day:
...and a very messy house that is not at all foot-friendly.

Next step: paint, buy fabric & foam, cut patterns and sew joint pieces together

Friday, August 9, 2013

Mason Jar Soap Dispensers

I saw some beautiful blue mason jars at Macy's a few weeks ago and HAD to use them for something. I got some cheap soap dispensers from the dollar store, Chris drilled a few holes in some lids, I went crazy with my black Rustoleum spray paint, and viola! We had 6 colorful soap dispensers.
White looks a LOT better in these jars...I filled 2 with lotion, 1 with dish soap, and 2 with hand soap, using things I already had at home. Unfortunately, the hand soap I had was honey hand soap.
It looks like Chris peed in the jar.
Still, it looks better than the cheap plastic dispensers, and we will buy new soap soon.
I would recommend getting nicer pumps than dollar store ones...we got them because we are cheap, and didn't want to buy expensive soap dispensers only to throw away the bottle and paint the pump. Home depot, Lowes, and Hobby Lobby didn't have just the pump, so we bought some cheapo ones instead...but we've had some problems with them sticking. I think we may upgrade eventually.
The other thing that is nice about these is that they are totally reuseable. We glued the pump to the lid, but the lid unscrews, so we could hypothetically throw away the lids, rinse it out, and drink from it, use it as a vase, or even can with it. I think maybe someday I will get a whole bunch and use them as my drinking glasses, but for now, I love my soap dispensers. :)

Chest of Drawers Reconstruction

 When Chris and I were in New Mexico for his family reunion, we dropped by Hobby Lobby to get some things for his Mom. And I found an absolute treasure. Actually, it was a broken-down mess. It was what was once a beautiful piece of furniture...in pieces. Literally, in 8 splintered pieces. I think someone must have chucked it off the back of a truck, because it was absolutely dominated. The tag said that it was 90% off. We got this chest of drawers for $30 instead of $300. We squashed it into our trunk (next to the chop saw and drill, which for some reason had to come on vacation with us), and drove back to Provo with it a few days later.

We got home around 9:00, and we were so excited about our new piece of furniture that we put it back together that night. It was pretty simple. The wooden framing that separates the drawers was ripped out, and the interior drawer slides were all broken off, too. All of the drawer faces were separated, and one of them was completely off. It was made very poorly--no glue, no nails, no screws, just staples. (We were amazed they tried to sell it for 300, even intact...it probably cost them around 10 bucks to make!) With a few hours, some wood glue, apoxy, and a pair of pliers, we reconstructed the chest. Here's how it turned out:
 It doubles as a side table and a linen closet...I have all our towels (and some fabric and crafty stuff) organized inside it. I love furniture that has hidden storage!!

I got the lamp at a white elephant last year, and I made the pillows a few months ago with Ruth. (Oops, forgot to blog about that...) Ruth gave me the chevron fabric, and I chose Robert Allen's botanical blue print to accent it. They bring some comfort and color to our drab little apartment.
Ruth is a great sewing buddy...She not only let me use her machine and helped me work out the patterns, but she helped me rip out an entire pillow sham that I'd sewn the wrong way. (I'm hoping that she will someday want to learn how to reupholster with me! I have a dream of getting some cheap thrift store chairs and reupholstering them with dusty-rose floral fabric.)

Pallet Projects

In early spring of this year, Chris and I decided to build some bedside tables. To save money, we bought 10 wooden pallets at $2 apiece, so $20 total. It was a lot of work to take all those nails out, and a lot of the wood was damaged and unusable when we were done (hence the 10 pallets instead of 5). But in the end, we had a HUGE pile of wood...enough to make some insanely awesome paneled rustic nightstands.

 ...Because we were using so many small pieces, we used a LOT of screws. Still, we probably spent less than $15 on 3 or 4 boxes of screws, and had lots leftover.

 The drawer is SUPER NICE. We splurged here and got the nicest drawer hardware Home Depot had...It opens so smoothly and you can pull it all the way to the back of the drawer. Drawer Hardware was about $30 for two. We got the bird drawer-pulls at Hobby Lobby for about $4 each, so $8 total.

Mom and Dad gave Chris a Kreig Jig for his birthday. It was absolutely invaluable in this project...all of the wood was about 3 inches wide, so we had to attach a TON of little pieces to make any kind of surface. You can't see in these photos, but the sides and back of each one are paneled, as well as the top. It took us a lot of time to put these together--used up all of our weekends and free days for about a month and a half. We LOVE them, but we've agreed we would NEVER build these ever ever ever again....it was too much work reusing old pallets and jigging all those tiny pieces. However, it was a good deal...We paid $72 for both of them! (And that would have been closer to $50 if we had done a little work and got free pallets...still, I think the wood was a little better quality and in better shape buying it. Most pallets are hardwood, and the different kinds of woods add some nice character and color to each piece. We decided not to stain them, because we loved the natural color of the wood.

We did have a lot of wood leftover, and we didn't mind doing a few simple follow-up projects with some nicer pieces of wood.
  
 
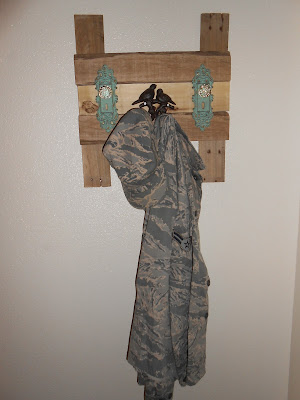
 I actually made this coat hanger by myself!! Chris wasn't even in the shop. It was pretty simple, and we found some pretty hardware that matched the blue birds on our nightstands. Total cost: $15 for hardware from Hobby Lobby.
 It may look a little feminine, but that hasn't stopped Chris from taking it over. He much prefers hooks to hangers or towel racks. ;)
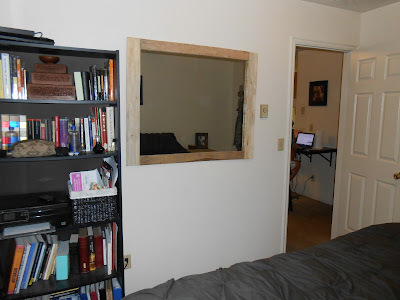
 I couldn't get a good picture of the mirror we made together...so this is the best I've got. It's also made of pallet wood, kreig jigged together and glued with mirror adhesive. Total cost: about $40. Mirrors are MUCH cheaper when you buy the pane from Home Depot and frame it yourself. It's actually pretty huge, this picture makes it look smaller than it really is.
We had some really interesting pieces that we turned into shelves. Again, it's hard to tell, but the edges are curved and uneven, and make it look like the wood just washed up on the beach. We used the Kreig Jig on these, too, so they look like floating shelves.

We thought about making a little headboard for our bed, but decided that we didn't want our house absolutely dominated by pallets. I'm planning on building a tufted white linen headboard, after we finish all the other projects on our list. (I'm redoing my spice cupboard, and we are sanding down our trunk and restaining it next week...and Chris has been doodling sketches for Ruth and Jordan's window bench for a while now. Today he told me he just "stopped by Home Depot really quick" to just "look around at some prefab that matches their wainscoting." I have a feeling that we will be building their bench in the next week or two, as well.)

Sunday, May 26, 2013

Canned Beginnings

Yesterday was a very busy day! Allison, Chris' sister, is staying with us, and she has been such a good sport--we dragged her all around the valley yesterday, and she was so helpful and patient with us. She came to help Ruth and Jordan move into their new house (which was pretty fun to start organizing and setting up. Evelyn was super cute scooting around on the slippery wood floors and sucking on everyone's frozen water bottles.) We ran some errands and came home for a nap, and Chris got a really bad migraine. About this time I was feeling really bad that we didn't have a fun plan for her first day here, so I decided it would be fun to do something crafty, and strawberry freezer jam was the winner.
I'm not sure if Allison really wanted to make jam, but I thought it was fun, and she was really really helpful--she washed all the jars and kept track of the timing....actually, she did most of the work. I really hope she liked it. I had a lot of fun getting to spend time with her and getting to know her better.
It was really nice to be able to finally use some of the mason jars from my reception...They have been filling up more than their fair share of space in my cupboards. Now that I've tested the waters with freezer jam, I'm starting to get ideas about applesauce and peaches...I need a teacher, and a pressure canner.

Note: I'm really, really, really glad we followed the instructions (the recipe from the Pectin box) EXACTLY. When we did our first batch, we were really surprised at the amount of sugar it said to put in, and when we tasted the sugar and strawberry mixture, it was overwhelmingly too sweet.
...But after we added the boiled pectin and water mixture, it was absolutely perfect. (Thanks, Allison, for reassuring me and convincing me to not half the sugar in the next recipe!!)

About the time we were cleaning up, Chris resurfaced and we decided to have a cookout (Bratwurst is always good, but it is absolutely amazing on the grill!!) Daniel and Heather came over, too...it ended up being a really fun night.

Any recommendations for things to can? I know peaches and applesauce is always good, but my imagination seems to halt there. ...Also, does anyone want to can with me next month (Assuming here that only my family reads my blog...sorry all you random internet surfers. ;))


Friday, May 24, 2013

My First-Ever Garden!!

I have very fond memories of gardens from my childhood...the one in Zanesville, Ohio that seemed like an entire field of beans, the modestly sized one in Portage, Michigan that was carefully tended by the deer and rabbits, and the one I helped my parents plant at a neighbor-sponsored community garden...I was so excited to make beet chips with that production, and I never did.

When Chris and I moved into an apartment with garden plots, I immediately wanted one. And a  month or so ago, my sweet husband went to the office and picked one out...the huge one on the corner. :) ...and for the past month, it has been enthusiastically befriended by every weed--and
tree!--that grows in Utah.

So, yesterday, after a few hours of planting a plethora of flowers in Ruth's new garden, the mud between my toes whispered to me and I felt a surge of excitement to plant my little vegetable garden. Ruth, Elise and I went to this ADORABLE little nursery in Orem--seriously, I want to live there--and picked out the plants I had planned and several we impulsively fell in love with. ...And after a whole morning of gardening, Elise still had the kindness and energy to stay with me and plant. (Ruth had to take Evelyn home for a nap, but she lent me her gardening tools.)

I had assumed that, since it was just a small plot, we wouldn't spend much time...pull out a few weeds, maybe turn over the soil, and viola! a perfect garden.

The weeds had other ideas.

Elise and I spent about 3 hours just preparing the soil of this tiny 4x5 plot. The weeds did not want to be weeded, and the trees were very thick and very deeply rooted in the dusty rock that some fool called soil. And someone before us put a ton of mulch in the garden, along with a lot of BIG rocks...so we filled 4 or 5 bags with all of that junk before we even got to all the roots. After a LOT of work, and about a dozen watering-cans of water (Seriously, that soil was a dry, solid ROCK), we finally started turning over the soil and mixing in some planting soil. About this time, Elise's hand ripped open (she had an enormous blister) and we went inside to clean it and bandage it up. I was feeling pretty awful about having her help around now, and getting ready to call it quits, but she went right back outside and we kept working. (Thankyouthankyouthankyou, my sweet hardworking sister!!)

Eventually, we got around to planting, and it was so fun and SO satisfying. This is what we fit in our little garden:
6 red lettuce
6 lettuce
1 zucchini
6 green bell pepper
2 strawberry
1 row bush beans
1 row tricolor beans
1 row sugar snap peas
1 row green onion

It is such a beautiful little garden, and I was so excited about it that I couldn't bear to be done with it...so I gathered up some of the rocks I'd removed previously and painted them to be markers. Then I started worrying about the paint washing off in water, so I found some shoe water proofer and sprayed them all...It worked fabulously, the water beads up on the rocks!! So so cool.

I can't wait to show my family when they come out for all the weddings!!

Wednesday, January 23, 2013

Sting Rays and Trinket Trays

I thought it would be fun to post about married life and how different it is from--well, not-married life.

But really, since we don't live together, and I only see him for a few hours in the evening (from 4 or 6 to 9, most nights), it feels pretty much the same as it did before we were married...just sinful.

I'm totally kidding. Married life is great. I mean, it's true, it was an adjustment from winter break, when we were actually TOGETHER all the time, but active duty life really isn't that bad.

The fitness center on base offers free aerobic classes every day of the week...they have yoga, pilates, zumba, weight training, spin/cycling, cardio/stretch, plus personal trainers all over the gym ready to yell at you like you're the new recruit they get to whip into shape. (I haven't been brave enough to step foot in the gym, but Danielle tells me they are very good at motivating you.) I've been going to yoga regularly, and I'm planning on adding pilates as soon as my muscles stop weeping in misery after every class. 

I've picked up sketching and crocheting again, and I'm starting my online class, Child Development, tomorrow. I'm hoping that sometime I will get around to sending thank-you notes, too. Plus, I'm helping Dana teach 28 3rd graders violin on Tuesdays. Note to self: have a party to celebrate that I will never, ever, ever be an elementary school teacher. Little kids are mean and scary! They don't listen when you talk to them and they never do what you tell them to, either. I have gained so much respect for teachers, and so much knowledge about myself: I now know that I am absolutely terrified of large groups of children. Scariest part of my week: Standing up in front of 30 little kids with violins, trying to get them to not damage each other or the instruments, and be quiet and listen and respond when I call their names on the roll.

Just for funsies, I'm going to throw in a few things I've realized, now that I'm married.

1. The snuggle-to-sleep expectation I had before we got married was completely dissolved. I don't know how Chris has SO MUCH BODY HEAT, but he does! We sleep facing away from each other, curled up on our sides, as close to the edge of our respective side of the bed as we can...and I STILL have to have a fan turned on! ...However, this may just be because Arizona is HOT in the winter. When we were in Utah, and didn't want to pay for heat, the sleeping arrangements were not quite so strict.

2. My recognition of love gestures has changed. Chris hates making the bed. Hates, hates, hates it. So on weekends, when I come back from the shower in the morning to see a freshly made bed, I know he loves me. I also feel extremely loved when he does dishes with me, folds laundry, and takes me to farmer's markets and to parks (with bread to feed the ducks!) Those little things make a huge difference when I know he is stressed and exhausted from work and PT and would really just like to sleep.

3. Nothing is gross anymore.

4. Chris is much more ambitious and disciplined than I realized. He can study for hours and hours! And he doesn't study just to pass his tests. He wants 100%. Every time. He gets up super early to exercise...not just to be in shape. He wants to be the fastest runner in his class. Every time. He wants to be the top graduate--have the best grades, no disciplinary record, best physical shape. Apparently, top graduate is a really big honor, and he thinks it will help him get better jobs down the road. Plus, he missed being top graduate in Basic because he spent his PT working with a kid that was failing the running...he would run with him, and keep him going, which slowed down his own time. He is still glad he helped him, I know, but I also know that he won't forget that he missed top graduate by 2 people, and he wants it this time around. Oh, and every few days he goes home early so he can review the material with some of the guys in his class that have been failing tests. And last week, he promised the guys treats after the block test--he made them scotcheroos. Like I said. He is a tiny tiny bit of an overachiever. His text last week to me was, "I got a 98 on my test. :( Missed a dumb question." ...and 5 minutes later "Got the points back! 100%." ...I am never, ever, ever letting him see my GPA.

5. Military uniforms take up SO MUCH SPACE in a washer/dryer. I swear, each blouse needs its own load! And those dog tags that everyone thinks are so cool and awesome? They bang you in the face if the person wearing them leans over you while you are quietly reading a book. Plus, when your husband is wearing his uniform, you can't show any kind of affection. Holding hands? Off limits! Don't get me wrong, the uniform looks awesome, but it kind of takes the fun and romance out of it when you run up--and then stop abruptly and smile.

6. Boys eat. A lot. I've never spent so much money on groceries. I always knew he ate a lot--but it's a lot more when he's exercising like crazy all the time. HE IS ALWAYS HUNGRY!!

7. Marriage is a ton of work. And when people are under stress, and homesick, and worried about one another, and possibly a little sad and lonely, it is even more work...it is wonderful and fun and rewarding, but being married, and being married away from home and mostly away from one another, requires so much effort and validation and love and assurances on the part of each partner. Every day, Chris comes to meet me, and I swear I can see the worry in his face...did I have a good day? Am I unhappy? Do I wish I were back in Utah? Is he worth it to me? And I know I come to him with my worries and insecurities and questions. It is beautiful and wonderful to spend the evening talking and cooking and laughing and reminding one another that we DO love and appreciate each other, that we think the other person is doing good things, and that we are so much happier here together than we would be anywhere else.

8. It is a good idea to change your name and marital status before you flee the state. We still don't have our marriage license, and so we can't change my name on anything...it just makes everything so confusing. I think I'm still technically Rosalind Clarissa Decker. I'm hoping to be able to change my name sometime before April.

9. Chris really, really, really likes football. And apparently wants to coach when he retires. And open some kind of store where he can tell people about "his wares" ...upon further questioning, a trinket store. But not trinkets he makes, just ones he can tell people about. He also loves zoos.

10. Sometimes when you are married, you have to do things you don't want to do because they make your spouse happy. Like when we were at the aquarium, and I really, really didn't want to feed the sting ray, but Chris really wanted me to and thought it would be so cool and fun, and he even bought another thing of shrimp when I got scared and dropped the last 2 pieces in the water and flipped the sting ray...so I made myself stay put and feed it. It took off a chunk of my skin along with the shrimp, and it was slimy and hurt really bad, but Chris was so proud and excited and happy and kept saying, "You've fed a sting ray!" ...which did, in fact, sound pretty cool, even if my finger did hurt a ton, so we celebrated with some hand sanitizer.

That's it, that's all I've got, I'm going to bed.

Friday, January 11, 2013

Love and Sacrifice

I've been learning a lot about the relationship between love and sacrifice this year. My patriotism levels were pretty close to indifferent before Chris enlisted. They slowly rose as we dated and became engaged, and spiked when he left for basic training and tech school...I found my love for my country increase tremendously when it meant sacrificing all contact with Chris but 1 letter a month and a 10 minute phone call a week. I've found the same principle to be true in other things...I feel so much more love for people that I serve and sacrifice to help. I feel more love for God when I consecrate my time, talents, and heart to him, and do his will.

I think Chris has been pretty worried lately that I am resentful of his military service--that I feel neglected and abandoned. Nothing could be further from the truth. He is working so hard right now--he studies constantly (He is trying to be the top student in his class...it's so funny to hear him say in a sad little voice, "I got a 94 on my block test.") And he is killing himself in PT trying to be the fastest and strongest. And on top of that, he gets about 5 hours of sleep each night, works like crazy all day, and stops by for a couple hours in the evening to spend time with me--and manages to be energetic, attentive, and happy to spend time doing whatever I want to do, when I know he is exhausted and his body just wants to nap. I think Chris is worried that I am upset that I get so little time with him, and that he can't live with me. But I'm really not--I feel so loved right now. Chris works for the things he loves...and he loves his country, and God, and me. We both feel that it is God's will that Chris serve in the military. But I know that it is more than just that to Chris. He sees it as serving his country, but most of all as a way to protect and provide for his family. So every night at 9:30 when I drop him off on base, I know that he doesn't want to leave me, and I don't feel abandoned. I feel loved--because I know how hard it is for him, and that he would rather spend all the time in the world with me...but that his service is an act of love for him.
What you give for something really is an indicator of how much you love it...and how much you give increases your love exponentially. I can tell you right now, I appreciate Chris a whole lot more when he isn't around, and I have so little time with him. And I love him so much more because it is a sacrifice to be here in Texas, away from my family and friends and school and our sweet little apartment. But he is worth it--it is worth the struggle of living in a strange place, if it means I can spend more time with him.

But, since I have all of this time to myself to ponder and wonder and pick up old hobbies, I ended up with a poem forming in my mind and flowing out of my fingers onto a piece of paper.

To My Husband Chris
Who leaves, but never leaves me feeling unloved.

Men love what they hurt for;
What's free is unloved.
But rights become treasures
When paid for with blood.

Men love what they work for;
The greater the price,
The deeper the meaning
In each sacrifice.

Men love what they hurt for.
I see what you give
For your country and God
Each day that you live.

Men love what they work for
And your love for me
Flows deeper and sweeter,
For you've served for me.


Chris, I love you so much....and I know you love me. Thank you for your service--I wouldn't change it if I could. I can't wait to have you home. You have, as always, my heart.

I'm pretty sure that poem will have a lot more meaning 1.5 years from now, when Chris is half a world away, and we are half way through a 6 month deployment...I'll probably look back and think, "that was nothing, why was I such a wimp? I got to see him every single day!!" ...but that's okay. Right now, this feels like a sacrifice, so why compare it to later or earlier or other people's sacrifices?

Either way, I got a poem out of this one. :)


Tuesday, January 8, 2013

Phoenix

The past few days have been absolutely crazy here. It has been really stressful adjusting to living in someone else's home, having Chris gone all the time, getting used to a new town, and trying to make friends with the few people I do have contact with here. Plus, I miss my sisters and my old roommates like crazy. I just miss being independent and surrounded by friends and family.

But after one absolutely insane day full of confusion, anxiety, disappointment, and breakdowns,  I thought things would settle down. I had a really good talk with Dana, the woman I am staying with, and spent some time with Danielle, a girl that lives 5 miles away and is married to Chris' friend in his flight. Danielle and I hit it off right away--she is so sweet, she loves music, and she has a background in psychology. Plus, she got married 4 days before we did, so we are at the same place in life.

We are already great friends, and we can tell each other pretty much anything. So, day before yesterday, (and the day after my Horrible Disappointed and Confused Day, the day that Chris and Jordan (her husband) left for base), we sat down for about 5 hours and just talked. I told her about my Horrible Disappointed and Confused Day, and she told me about her same day. Interestingly enough, we had had strangely similar days. Oh, and she told me she was pregnant. (Note: Military wives really are like family. There is a connection there that you just can't have with other people. At first it seemed strange to me that I was the first person she told, before even her parents or his--but then I thought about it, and realized that even though we only knew each other a week, we had come to really rely on one another...I am the only person she knows down here.)

Anyway. As I said, I thought things would kind of settle down. Silly me.

Yesterday, Danielle and I met up to explore base...we drove around a little, trying to avoid the MPs (Military Police. Insanely strict, insanely mean. Will pull you over for going 26 in a 25 mph zone, or for talking on the phone in a car that is turned on....and probably a lot of other things we don't know about yet. I'm scared of not using crosswalks.) We ended up looking around the BX (Base Exchange...kind of like a mall, but with a grocery store. Everything is super cheap there, and tax-free.) We got a few things there, and headed for the checkout, when Danielle stopped and grabbed an aisle shelf for support. Her face was crumpled in pain. I felt panic rise up in me. "Danielle, are you okay?" She sank to the floor and managed to say, "I don't know. It hurts really bad." I tried to keep my voice calm and asked, "Does it feel like contractions or cramps?" "It isn't cramps." "Are they rythmic?" (I honestly had no idea what questions I was supposed to ask, and I was thinking about yelling at someone to go get help.) "I don't know." By this time, I was holding her hand, and praying mantra-style, 'God, don't let her have a miscarriage right here in this store. Don't let her miscarry, don't let her miscarry, don't let her miscarry." I was scared and I felt dread flood my insides for her--I knew she was more frightened than I, and I just couldn't bear the though of her losing her baby so far away from home and friends and family, with no small comfort but me, and her husband out of reach, unable to come be with her. She looked up at me, and I knew she wanted me to have an answer and tell her what was going on, but I just didn't have anything to offer but a suggestion to find an OB/GYN in Phoenix for the next few months and my silent prayers to God.

Eventually the pain lessened, and we made it to a chair outside the food court. Chris called and said that they were given permission to leave the base, and could come see us. I told him, "Get here as soon as you can, and bring Jordan." It was a relief to see them drive up and Jordan jump out to hug his wife and talk to her. Chris hugged me too, excited to see me...I held on to him and tried not to cry. I felt drained.

So basically, things haven't settled down, and every single day is incredibly emotional, scary, or sad. Today I am scared because Aunt Dana asked me if I would come help her teach violin to a group of 36 little children, and I don't know how to even tape the violins, let alone teach them how to play and make them behave...but she said she would show me what to do before each lesson, and implored me to help...I don't think she wants to have to deal with them alone. Anyway, so that's my scary thing for today. 

I miss Provo so bad. But I wouldn't want to be separated from Chris, not for all the comforts of our little apartment and that town I know so well and my friends and family. So I'm staying for the whole 10 weeks. I think this will be a great adventure....albeit a very stressful, emotional one.

I miss and love you all.